Showing posts with label pearls. Show all posts

Saturday, 4 April 2015

Cascading Lace...


Hi All 
 I decided to bring you a card this time over on the Tattered Lace Blog ...a cascade card...but I wanted a background too, so here's how I made it....
(This post is a bit photo heavy, but I think it's easier to follow with pictures :) ) 

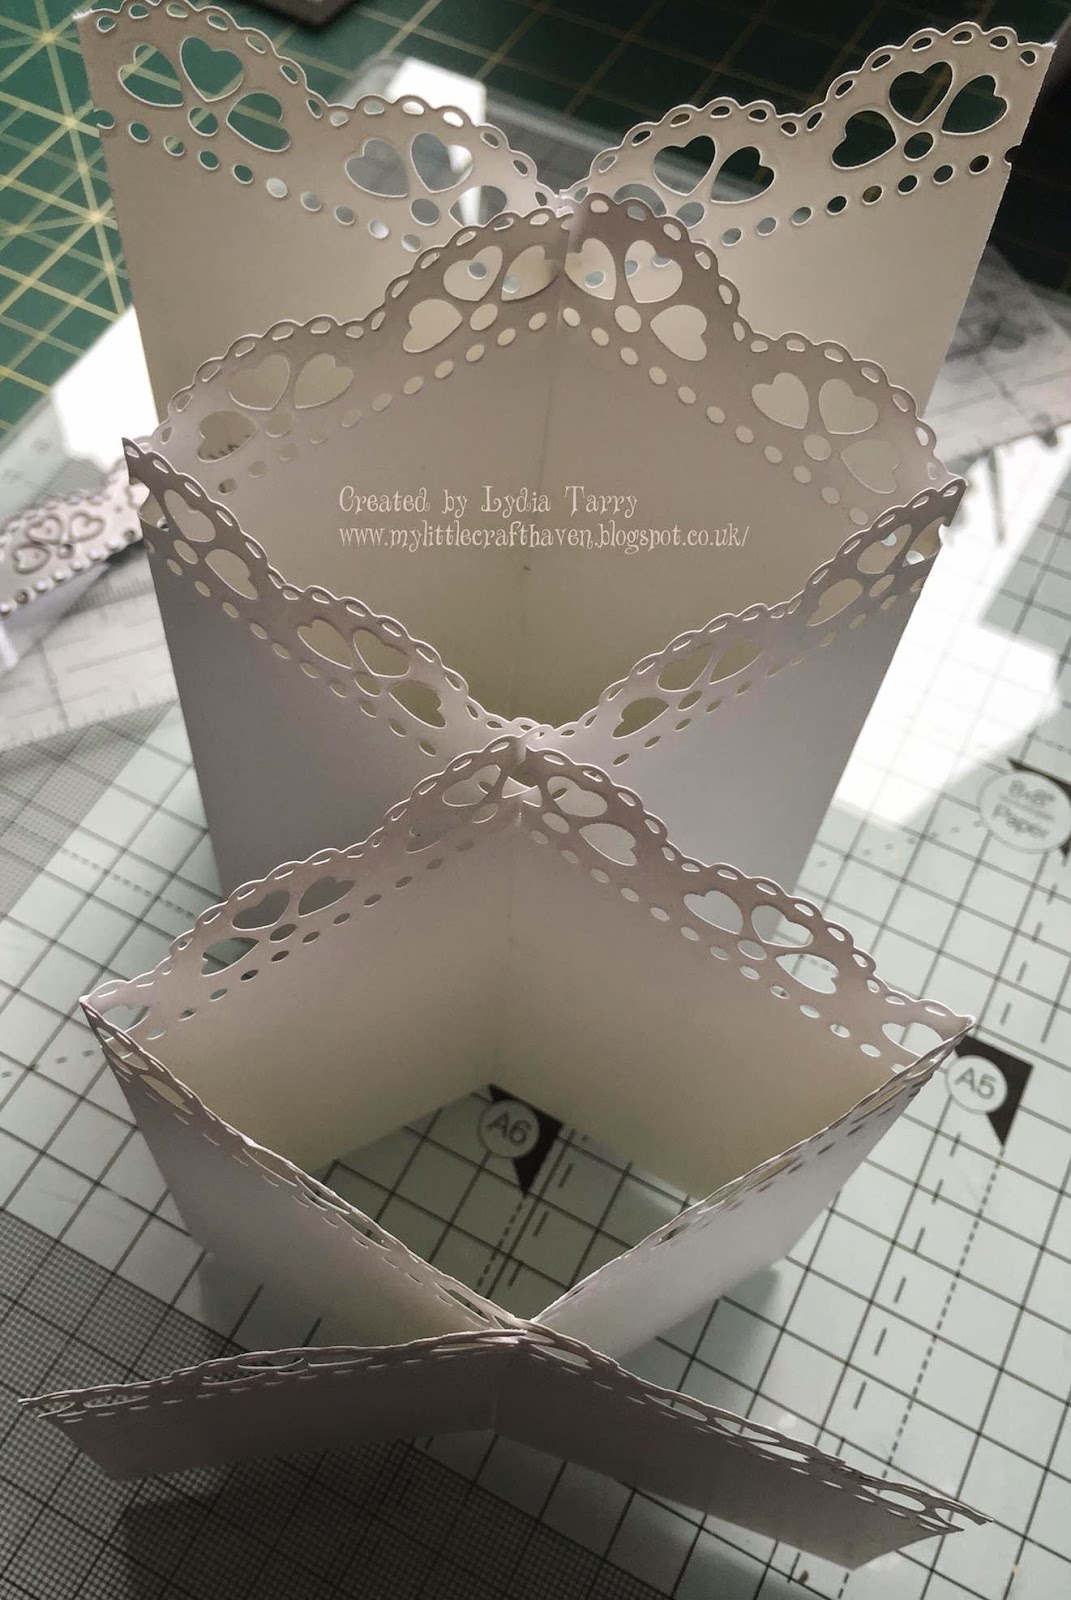
To make the cascade card you will need two pieces of 5 1/2 x 12" white card stock. 
On each piece, measure and mark the short side at 2 1/2" from the bottom.

Cut across from 5 1/2"  to 2 1/2" on both pieces so you get a wedge shape.

On each piece score at 2" 4" 8" and 10" .

Next you need to measure and mark the longer side at 2 3/4" ...and the shorter side at 1 1/4".

With a long ruler, line up the two edging marks and then at the point the ruler crosses the score lines - make a mark.  You also need to make a mark at the 6" point...but do not score or fold at 6".

The slope of the wedge is the top of your card. 
Take one piece. From the bottom, cut UP to the little marks that you made at 2", 6" and 10" intervals.

On the other piece, cut DOWN to the marks at 2, 6 & 10".

Fold on all the score lines...but remember...DON'T fold at 6".


I have used the Scalloped Heart Border die to edge the top of the cascading part.


Now we can put it together.
Starting with the two longer ended pieces, interlock the cuts, so they slot together at 2, 6 & 10".


Fold it - so it 'cascades' as in the picture.


You are then ready to decorate!

I used some of the gorgeous papers from Stephanie's 'Sugar Rush' Collection to make panels for the cascade card and to cover the 7 x 7" base card. 
The papers were embossed before cutting, using the Tattered Lace - Script - Embossing folder.
All the panels were edged with Worn Lipstick Distress Ink, before adhering to the card. 
I also put a 'smidging' on the decorative border edge. 

The beautiful Majestic Daisy, was cut twice in green mirror card, and twice in pink. 
The Just for You washing line die was cut once in green mirror card and once in plain white card stock.
The small butterfly from the Build a Butterfly set was cut twice in pink mirror card and once in green. The large butterfly was cut once each in pink and green...and the body - once in green. 

Putting together!
The Daisy's were cut from the pink die cut and adhered over the green.
The large pink butterfly was adhered to the body, then the large green and small pink layered on top.
The small green layered onto the small pink butterfly...and the Just for You green wording shadowed over the white. 
These were all then adhered into place, with the Just for You being strung across the front, through a couple of holes from the border design at each side. 

The cascade card was adhered to the base card, and to finish it off, I added some pearls and a little bow .


Tattered Lace Products used...


Have fun!
Happy Crafting
Lydia xx

Thursday, 5 March 2015

Here Come the Girls......


Hello!!! I'm back... with the girls on the catwalk of the Tattered Lace blog this time! 
There is so much you can do with these dies...I'm loving them!

For this project I used an mdf base, well...it's actually a box top which will hold 'hair bands and bobs'...but you can make something similar as a card very easily. 


Take the project base of your choice and coat it with a layer of Gel medium or PVA & water mix. Cover with a piece of dressmaking pattern paper and add another coat of gel medium.
Die cut 4 x Kensington Corners...adhere those to each corner.
Randomly spritz with paint/glimmer mist or similar. Dry off with heat gun.
Arrange different sized and coloured buttons in a couple of corners and adhere with hot glue.
Take a length of lace and make a bow with the small Bow Maker (absolute must have item!!! ;) )
Adhere to a big button in the corner. Make another bow with narrower lace and ensure you leave long enough tails to trail over the base.
Layer the two bows and add another button to the top. Glue down the bow tails.
Die cut the clock - Counting the Moments - then ink the hands and a few hearts in a contrast colour...adhere the clock and glue on the coloured pieces.
Die cut 6 of the girls and double layer them. Cut out dresses...again, doubling them up for a bit of strength and dimension. 
Cut out their shoes and hair...adhere the girls to the base and decorate them. 
Die cut some of the words from Fashion Sentiments in two colours to shadow them and add those.
Randomly dry brush some metallic paint to finish off your project x

Have fun!!


Tattered Lace Tools

Embellishments
Lace Trim


Happy Crafting
Lydia xx

Tuesday, 17 February 2015

Gorgeous New Bella ~ Easel Box....


Hi All
Today I'm sharing some fabulous new Tattered Lace goodies... including dies, an embossing folder set and loads of awesome embellishments! :)
I have made a drawer based easel card from some plain white card stock. Cut some panels for the sides and top from designer paper, then embossed them with the lovely new 'Script' embossing folder. These have then been edged with distress ink. I attached a length of the gorgeous new ribbon across the top of the drawer base before adhering the easel card.
I put together a 'stop' panel (the bit that stops the easel part of the card from falling down flat) and made a double looped bow and stuck it on. To which I added a couple of flat backed pearls and one of the beautiful new resin flowers... I also added one to the front of the drawer.
The new Bella's Body was cut from vanilla card stock, and also edged with distress ink. Bella has some wonderful new clothes and accessories available, of which I used Bella's Short Dress and one of Bella's Hair dies. I've cut one each of the short dresses and layered them....then cut a further 8 of the lacy short dress and made them into a double tiered long skirt back for her. I cut her a matching pair of shoes and gave her a lovely long hairstyle.

With a couple of Rose Corners, cut and distress inked for the easel top, and a parasol for Bella, all she needed were the words...Bella......Gorgeous New Chic Lady in contrasting brown cardstock to finish it all off. The easel card can be folded down and tied with the ribbon x


Tattered Lace Tools

 Take care
Happy Crafting

Lydia xx

Thursday, 26 September 2013

Flutterbies and Flowers...

Morning all :)
Just going through picture files and realise there is so much I haven't blogged!! Bad me seems to Facebook things these days and neglect my blog...tut tut !!
Sooooo....here is a card I made mainly with the Time Flies collection from Craftwork Cards and an image from Saturated Canary.
I have also used Grand Decorative Circles from Spellbinders...Stampin' Up! Rich Razzleberry ink...Fran-tage embossing enamel (LOVE that stuff!!) ...a bow made from lace.. the image coloured with Prisma pencils...all put together and made with love xx
Have a fab day xx

I'm entering this into ...
Sweet Stampin' Challenge - Glitz and Glamour 
Stampavie and More - Flowers 

LinkWithin

Related Posts with Thumbnails