

Hi All
I decided to bring you a card this time over on the Tattered Lace Blog ...a cascade card...but I wanted a background too, so here's how I made it....
(This post is a bit photo heavy, but I think it's easier to follow with pictures :) )
(This post is a bit photo heavy, but I think it's easier to follow with pictures :) )
To make the cascade card you will need two pieces of 5 1/2 x 12" white card stock.
On each piece, measure and mark the short side at 2 1/2" from the bottom.

Cut across from 5 1/2" to 2 1/2" on both pieces so you get a wedge shape.

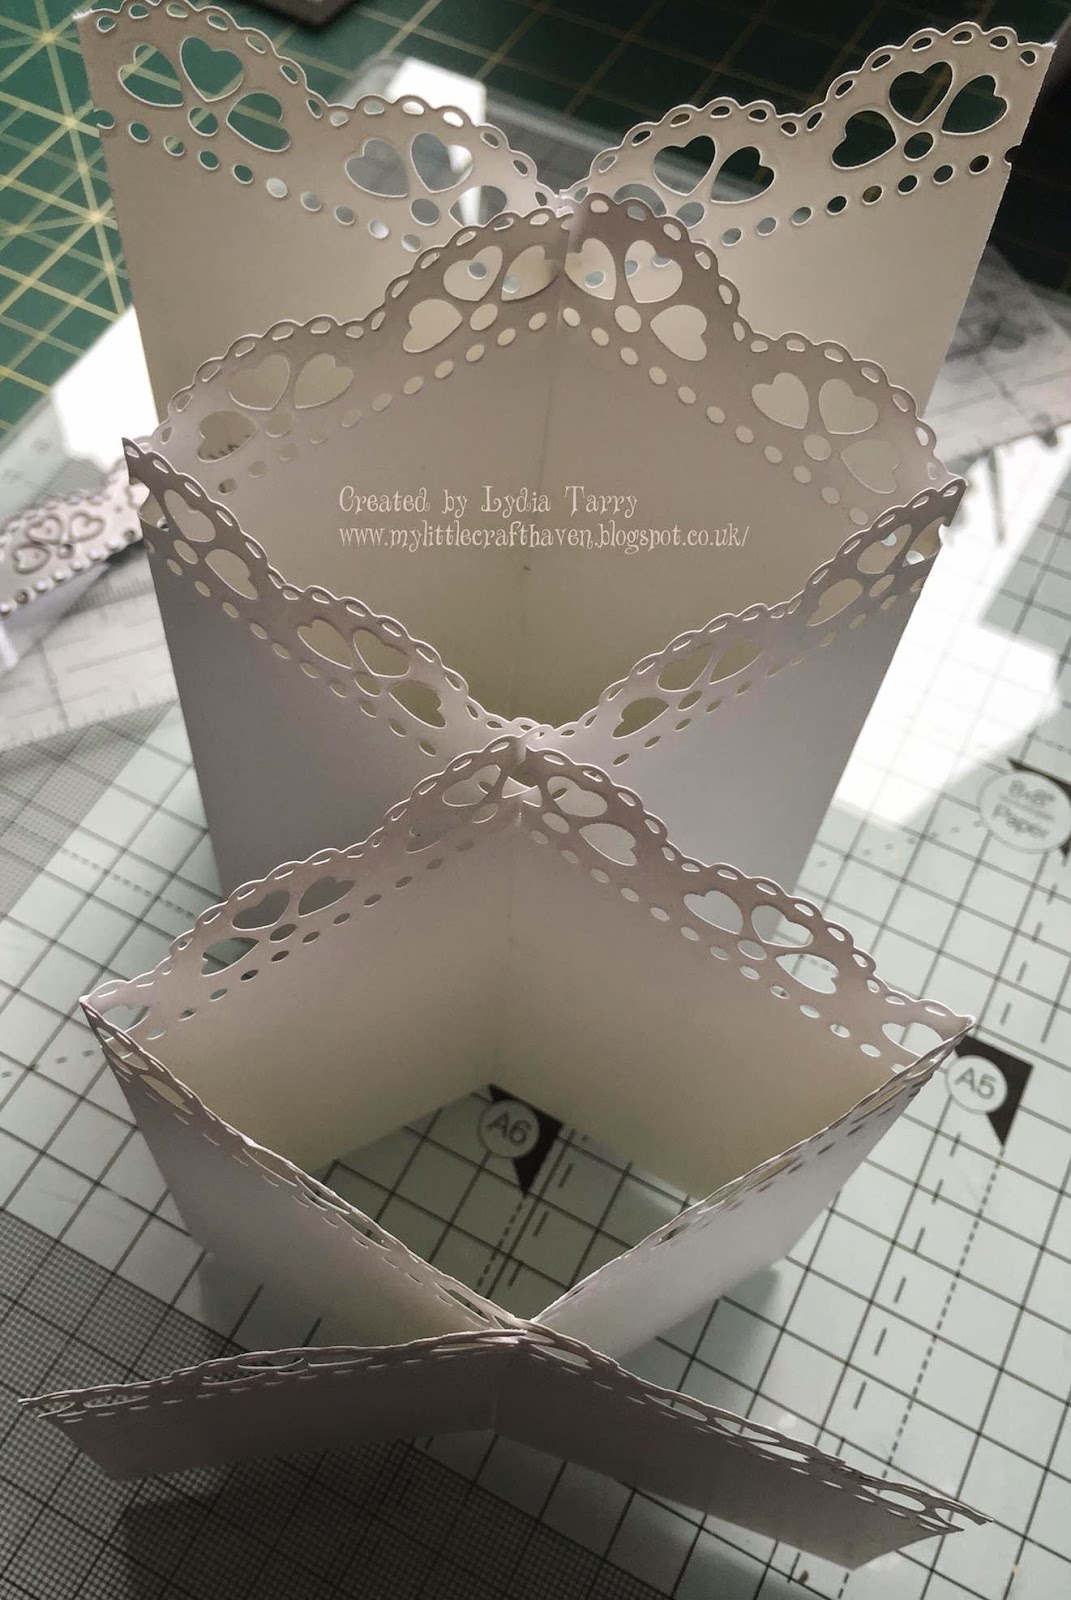
On each piece score at 2" 4" 8" and 10" .


With a long ruler, line up the two edging marks and then at the point the ruler crosses the score lines - make a mark. You also need to make a mark at the 6" point...but do not score or fold at 6".

The slope of the wedge is the top of your card.
Take one piece. From the bottom, cut UP to the little marks that you made at 2", 6" and 10" intervals.
On the other piece, cut DOWN to the marks at 2, 6 & 10".

Fold on all the score lines...but remember...DON'T fold at 6".

On the other piece, cut DOWN to the marks at 2, 6 & 10".
Fold on all the score lines...but remember...DON'T fold at 6".
I have used the Scalloped Heart Border die to edge the top of the cascading part.


Now we can put it together.
Starting with the two longer ended pieces, interlock the cuts, so they slot together at 2, 6 & 10".


Starting with the two longer ended pieces, interlock the cuts, so they slot together at 2, 6 & 10".
Fold it - so it 'cascades' as in the picture.


You are then ready to decorate!
I used some of the gorgeous papers from Stephanie's 'Sugar Rush' Collection to make panels for the cascade card and to cover the 7 x 7" base card.
The papers were embossed before cutting, using the Tattered Lace - Script - Embossing folder.
All the panels were edged with Worn Lipstick Distress Ink, before adhering to the card.
I also put a 'smidging' on the decorative border edge.
The beautiful Majestic Daisy, was cut twice in green mirror card, and twice in pink.
The Just for You washing line die was cut once in green mirror card and once in plain white card stock.
The small butterfly from the Build a Butterfly set was cut twice in pink mirror card and once in green. The large butterfly was cut once each in pink and green...and the body - once in green.
Putting together!
The Daisy's were cut from the pink die cut and adhered over the green.
The large pink butterfly was adhered to the body, then the large green and small pink layered on top.
The small green layered onto the small pink butterfly...and the Just for You green wording shadowed over the white.
The Daisy's were cut from the pink die cut and adhered over the green.
The large pink butterfly was adhered to the body, then the large green and small pink layered on top.
The small green layered onto the small pink butterfly...and the Just for You green wording shadowed over the white.
These were all then adhered into place, with the Just for You being strung across the front, through a couple of holes from the border design at each side.
The cascade card was adhered to the base card, and to finish it off, I added some pearls and a little bow .

Tattered Lace Products used...
Have fun!
Happy Crafting
Lydia xx
Happy Crafting
Lydia xx